Giving Manny Feathery Hair - TressFX 'StrandUV' Down-The-Strand Feature
NOTE: This tutorial was written for TressFX 4.22, which has since been updated by AMD. The newer version is not the same as the version I am using, code-wise nor feature-wise.
OK. Let's continue from where we left off last time.
From the previous posts, we've gotten TressFX 4.1 compiled into Unreal Engine 4.22.3 and running. And we've created hair that tracks reasonably well to the Unreal Mannequin. The tracking is not perfectly tracking, as you can see some of the hair isn't tight to the skull....in front... But, that would likely be fixed if we had more bones in the head for the tracking to use. Right now, we are limiting tracking to use a single bone in the head. And, of course, this is based on exporting the Mannequin skeletal mesh out of Unreal as an FBX, then importing it into Maya and doing the hair export using that FBX, then using the exported hair files with the original Mannequin. This may lead to other inaccuracies during the export/import process.
But when I've created custom models and used them, like a basic sphere with 5 bones, I've found the tracking works perfectly. So I'm going to assume this is an issue with FBX conversions.
Documentation and Exporter also available from the GPUOpen (non-Unreal) TressFX 4.1 branch:
https://github.com/GPUOpen-Effects/TressFX
Top of the Blog (to get to earlier blog posts): https://augmentyourrealitysafely.blogspot.com/

 Here is Manny with the default color values. When you read the Developer Guide, you'll find that if you don't have any textures, then the hair base color and tip color (if used) will be used to color the strands. Right now, we have a light gray base color and purple tip color with .2 of the hair being controlled by the Tip Color...i.e. 20 percent from tip upward should be purple. This type of tinting is imprecise because it happens in the vertex shader and is dependent on where the actual vertices reside on the strand and how many vertices are being used to define a strand. These values come from the hair export. But it also means that the CV points used to define a strand may cause 'bunching' of vertices, so 20% on one strand could be very different from another strand with different CV positions. You'll also note the Fiber Radius is set fairly low. (For realistic hair, you'll often end up either with a lot of hair with very small radii, or less hair with wider strands but with textures that mimic 'multiple strands'. This is what Tomb Raider did when they used an earlier version of TressFX.
Note: the dark areas in the image of Manny's hair (above) are because of the lighting in the scene.
First I'm going to increase the Fiber Radius so we can see the texture effects better (we can also see the Tip Color better.)

StrandUV takes two textures, an Albedo and a Tangent Based Normal map. I detailed how to use it in the Developer Guide, and covered a number of examples. So for more information, laid out in a more documentation format, see the Developer Guide. The premise is simple, a texture is mapped 'down the strand', and its normal map (for lighting) is done the same way. If the textures need to be squashed or stretched to fit the current length + width of the hair strand, then they will be. The same two textures will be used on each strand in that hair group. This means that if you have shorter or longer hairs in the group, the textures will stretch and squash based on that particular strands length/width.
Width of the strands are controlled by the Render Texture, which we created last time, in particular, the Fiber Radius value. But the length of each strand comes from the DCC tool you used. For example, if you created a shaggy haircut and exported all the hair (the splines) as one group, then you have a hair group with mixed lengths.
Note: You can also tile the StrandUV textures (the tiling will be the same for both).

 So this time, I created a rough 'feather' texture, and did something you are NOT supposed to do. Which is why I love doing it! The shadows generated by the hair strands will ignore any transparency. They will behave as if the hair strand was opaque. So while you can have textures with transparent areas, the transparency will not be respected by the shadowing. It can lead to 'blocky' looking shadows - i.e. rectangular shadows, and not a shadow that corresponds to the shape...like my feather.
But I still like the idea of transparency and right now I'm not concerned with the shadowing effects.
But when I've created custom models and used them, like a basic sphere with 5 bones, I've found the tracking works perfectly. So I'm going to assume this is an issue with FBX conversions.
Can't you put up an Unreal 4.22 with TressFX 4.1 Built Engine?
I've gotten questions about whether I can make a binary available of the TressFX 4.1/Unreal 4.22.3 engine that I built. I wish I could, but because it's Unreal, you need to sign the Unreal EULA. So I can't legally give you a binary. I would recommend trying to build it yourself. All the tools are free and I outlined the basic steps you need to follow in the previous blogpost. OR you can find a developer friend (hobbyist or pro, it doesn't matter) and get them to build you a copy following the steps in the previous blogposts. It isn't that difficult. It's more a matter of downloading the tools, and getting access to the Unreal Engine GitHub Repository so you can download what is needed. AND having a good enough machine to compile. A lightweight laptop isn't going to be enough, but if your computer runs Maya and other DCC tools without an issue, then I don't believe you'd have any problem with building the engine.Here are some links you'll might want (see previous post for Build links):
My fork location: https://github.com/CGAnderson/UE4_22TressFX4_1/tree/4.22Documentation and Exporter also available from the GPUOpen (non-Unreal) TressFX 4.1 branch:
https://github.com/GPUOpen-Effects/TressFX
Top of the Blog (to get to earlier blog posts): https://augmentyourrealitysafely.blogspot.com/
StrandUV - Coloring Down the Strand
This post will be fairly short. We are only going to look at the first (easier) 'down the strand' feature that was added to TressFX 4.1. This feature is available in both the Unreal version and the Cauldron version. I will do a walkthrough of the more powerful, but much more complicated 'Hair Parameter Blending' feature in a later post, if there is strong interest. That feature is only available in the Unreal/TressFX 4.1 integration (not the simpler Cauldron framework/TressFX 4.1 integration).
 Here is Manny with the default color values. When you read the Developer Guide, you'll find that if you don't have any textures, then the hair base color and tip color (if used) will be used to color the strands. Right now, we have a light gray base color and purple tip color with .2 of the hair being controlled by the Tip Color...i.e. 20 percent from tip upward should be purple. This type of tinting is imprecise because it happens in the vertex shader and is dependent on where the actual vertices reside on the strand and how many vertices are being used to define a strand. These values come from the hair export. But it also means that the CV points used to define a strand may cause 'bunching' of vertices, so 20% on one strand could be very different from another strand with different CV positions. You'll also note the Fiber Radius is set fairly low. (For realistic hair, you'll often end up either with a lot of hair with very small radii, or less hair with wider strands but with textures that mimic 'multiple strands'. This is what Tomb Raider did when they used an earlier version of TressFX.
Note: the dark areas in the image of Manny's hair (above) are because of the lighting in the scene.
First I'm going to increase the Fiber Radius so we can see the texture effects better (we can also see the Tip Color better.)

StrandUV takes two textures, an Albedo and a Tangent Based Normal map. I detailed how to use it in the Developer Guide, and covered a number of examples. So for more information, laid out in a more documentation format, see the Developer Guide. The premise is simple, a texture is mapped 'down the strand', and its normal map (for lighting) is done the same way. If the textures need to be squashed or stretched to fit the current length + width of the hair strand, then they will be. The same two textures will be used on each strand in that hair group. This means that if you have shorter or longer hairs in the group, the textures will stretch and squash based on that particular strands length/width.
Width of the strands are controlled by the Render Texture, which we created last time, in particular, the Fiber Radius value. But the length of each strand comes from the DCC tool you used. For example, if you created a shaggy haircut and exported all the hair (the splines) as one group, then you have a hair group with mixed lengths.
Note: You can also tile the StrandUV textures (the tiling will be the same for both).

But I still like the idea of transparency and right now I'm not concerned with the shadowing effects.
So here is my feather (DON'T LAUGH! OK, laugh but give me SOME credit. I did it in GIMP in under 5 minutes with a mouse as input.)
So all you need to do to use StrandUV is to drag and drop (or dropdown select) the textures into the StrandUV spots. And turn on StrandUV. All of this is on the TressFXComponent, in the TressFX Details section.

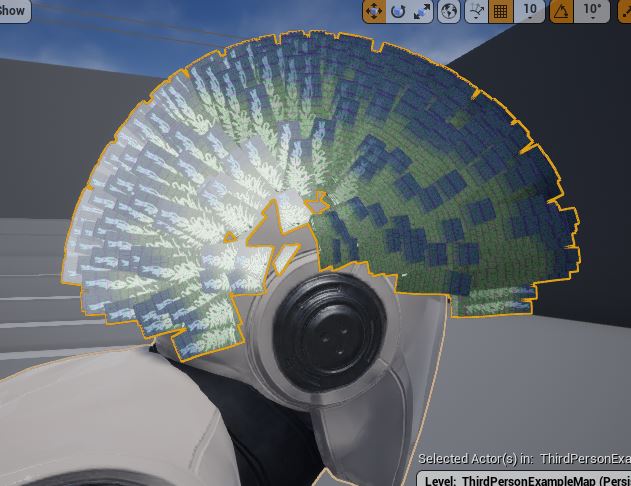
You can see that the tip of the feather (read corresponds to the end of the strand, and the 'top' of the image I used of the feather, corresponds to the root of the hair strand. In the above, I have StrandUV and StrandUV Tiling activated, but I'm only doing a Tile = 1 (no tiling), so it stretches.
If I change the Albedo Texture (but keep my rough feather Normal map), you can see the normal map effect more clearly. My normal map is just white dots, so it doesn't allow for a lot of variance in lighting, but you get the idea. I used a standard Brick Normal map as Albedo, essentially giving him a light green Albedo. (Unreal has a bunch of textures available, so I just grabbed one and wanted it to be a light color, so you could see the feather normal map shape.)
Likewise, if I increase the tiling to 5, we can see the feather pattern repeating down the strand.


Which can give you some interesting effects.
Back to Tile=1. A closer look:

I can certainly imagine some scenarios where having non-traditional patterns (like feathers) might make for a fun character, and the added benefit is that you can use fewer strands and save yourself a lot of extra graphics processing.
For realistic hair, TressFX works fine, too. But as I said, it takes a lot more hair, very careful texture usage, and a lot of processing power for both the rendering and the physics simulation.
Up until this point, we haven't added any collision abilities, so I've kept the hair fairly stiff so that a collision mesh isn't necessary. But for the hair to interact with the body correctly (and not penetrate), then we need to add a collision mesh for the areas that will come in contact with the hair.
Then Manny can finally relax, and 'let his hair down'. (Pun fully intended!!!)
We also haven't explored the ability to use a UV mapping for the scalp, meaning NOT down the strand coloring, but picking a color for the hair based on where it is located on a UV mapping of the body, just like you would do for normal UV mapping of a mesh. But in this case, that chosen color at that UV position lets us have different colors for each strand of hair.
We can still use StrandUV in addition to this overall UV mapping color, the two will actually blend together. Likewise, we can also use the more complicated Hair Parameter Blending on top of the other coloring abilities. It allows a lot of flexibility, but it also means you need to be careful. It's easy to create situations where one color is overwhelming the others.
But those are subjects for later posts!
As usual, I'll upload the feather and featherNormal textures I used to my TressFX 4.1 Unreal 4.22 repository (4.22 branch only...so use the dropdown and select 4.22...and not the default 'master' branch when looking for my TressFX updates). For now, I'll put them in the HairFiles directory.
I hope you enjoyed this post. If you did, please do me a solid and click an Ad. If you didn't enjoy the post, show me some pity and click an Ad anyway.
Cheers!
My opinions are my own, and no one else's. Anything I talk about is either my own opinion and/or research, or public knowledge. As for copyright, all copyright is reserved unless explicitly noted, this includes my work or any references I make to papers, websites, libraries, engines or similar, which belongs to the original copyright/license holder. Always remember to cite your references, and observe copyright and licensing when using or referencing any code or words or images or anything that isn't your original work. 'Nuff said, I hope. Let's get coding!


Comments
Post a Comment